The Partner Identity Management is an identity suite that offers suppliers to Register for an Account, Track Account/Request Status, Manage Password and Manage application access to supplier portal.
-
Partner Delegate/Supplier Delegated Admin (DA)
- Manages accounts and approves new account requests for the company.
- Validates user‘s business country and country of citizenship.
- Validates primary site selection.
- Responsible for maintaining their company‘s user list and removes users who leaves the company.
- Updates email domain information for registration as needed. Emails with social media domain names (such as gmail.com or yahoo.com etc.) will not be approved.
- Partner User/Supplier Regular User
- Requests an account and registers after Partner Delegate Approval.
- Requests access to any required applications.
- Sets primary site from drop down menu as part of profile creation.
- Selects appropriate “Job Role” during registration and profile creation.
- Manages account information profile.
- Applied Materials Application Approver
- Approves Application requests.
- Manages Application Access.
- Audits list of their application(s) users quarterly.
- Applied Materials Partner Owner (CBM/SBM)
- Approves the email domain(s) for enrollment.
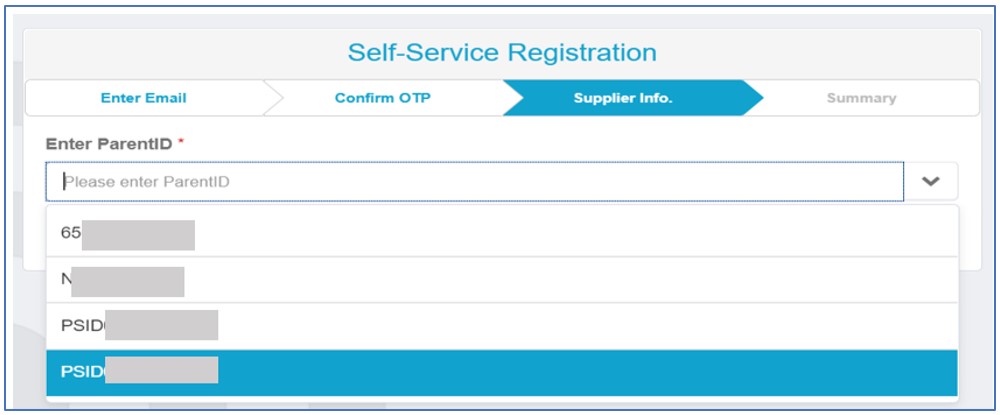
- Provides parent ID for registration if required.
- Validates and Approves the Partner Delegate(s) for the parent profile.
- Delegates requests to NDA coordinators if required.
This chapter will brief the process of registration for supplier to register an account.
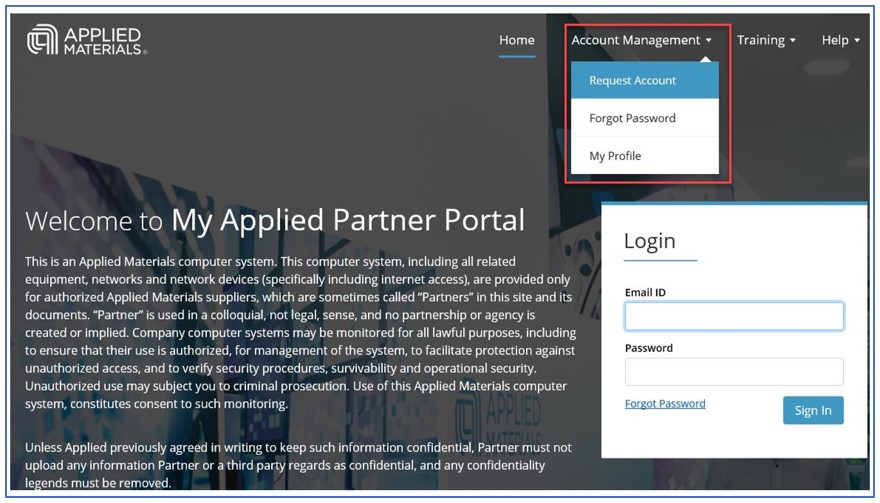
- Go to the url: Supplier Portal. Select ‘Request Account’.
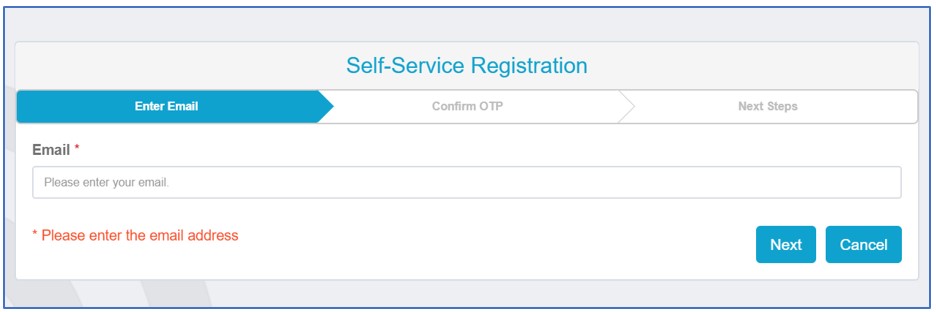
- It will re-direct you to the self-service registration. Enter your email to begin the registration.
- TIP: Please use your organizational email address.
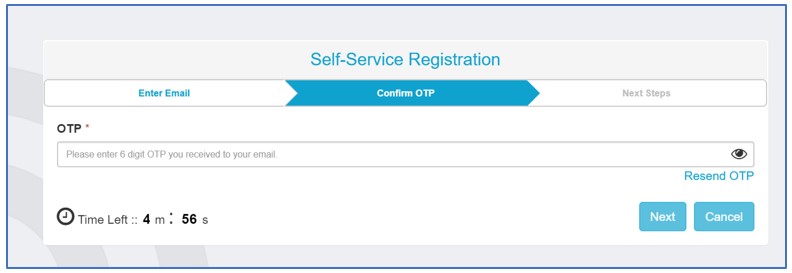
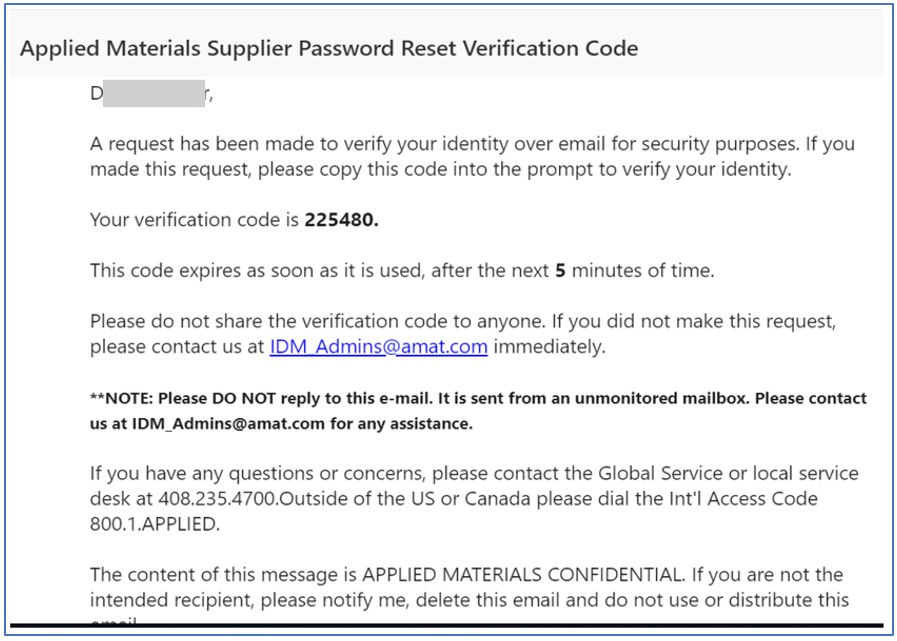
- The next step is One-Time Password Validation (OTP). You will receive an OTP to the email address you used in the previous step. Enter the OTP pin here to proceed.
- Email notification of the OTP
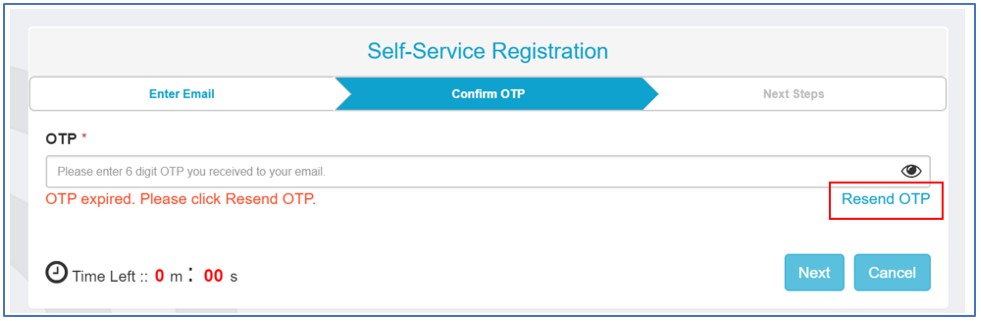
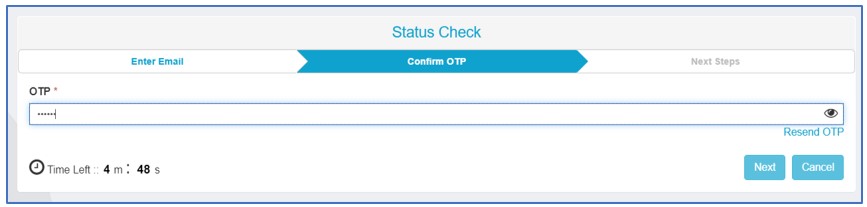
- If the OTP is expired. Please click ‘Resend OTP‘, a new OTP will be sent to your email address. Enter the pin in the below prompt to proceed further.
- After successfully validating the OTP, you will be redirected to the registration page.
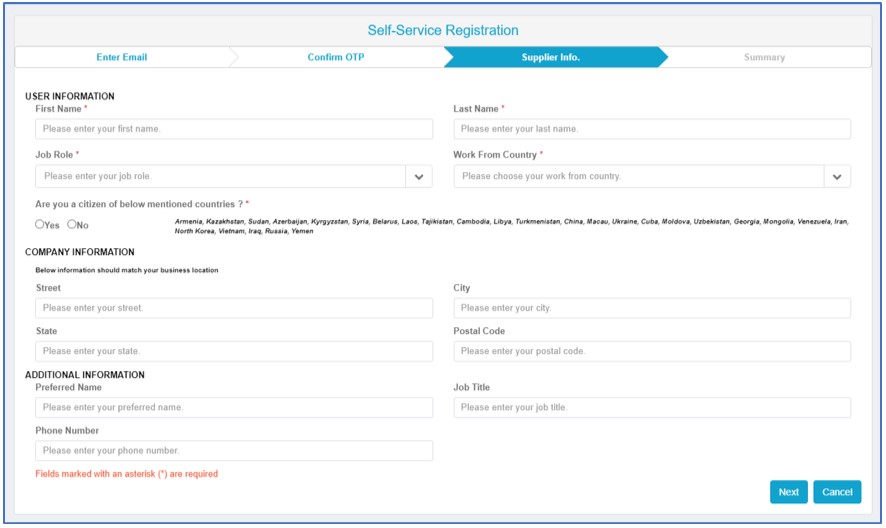
- Select your Job Role from drop down menu. For all generic accounts created for RFQ purposes, please select RFQ as a Job Role. Job Role helps Applied Materials buyers route the relevant information to the appropriate supplier contact.
- Work from Country will be the country you are working from.
- The user information section of the registration form is mandatory to proceed further.
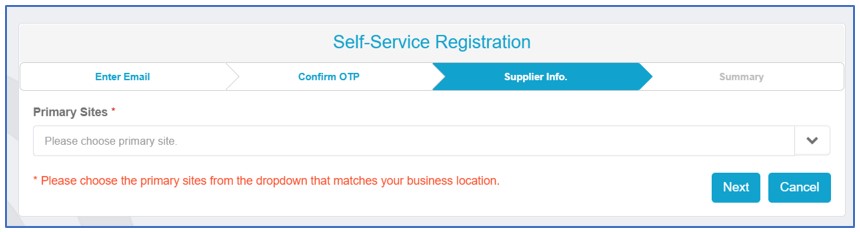
- The next step is to choose your primary site of business. Click the dropdown and select the appropriate primary site and then click ‘Next’ button.
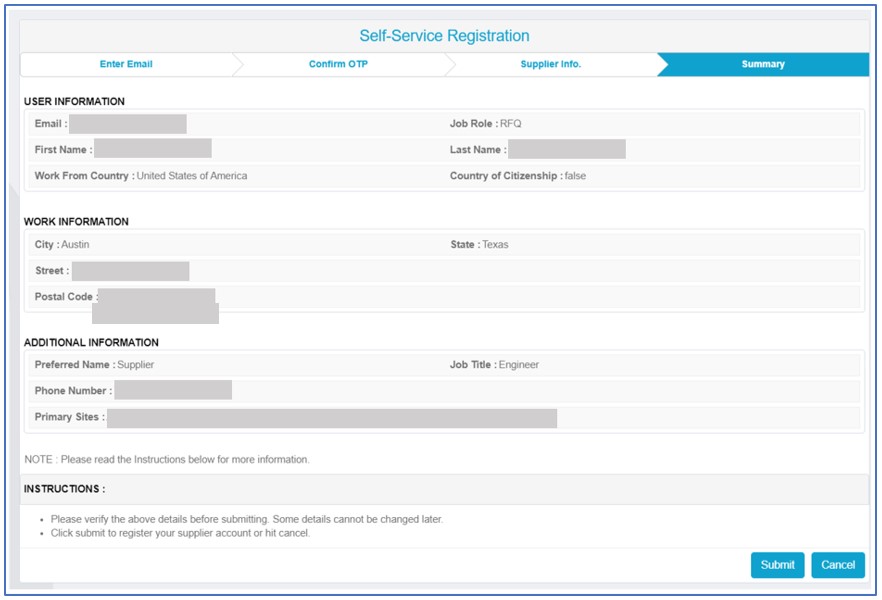
- The next step is to validate all your information that you have entered in each step. Click ‘Submit’ to submit your request for a supplier account.
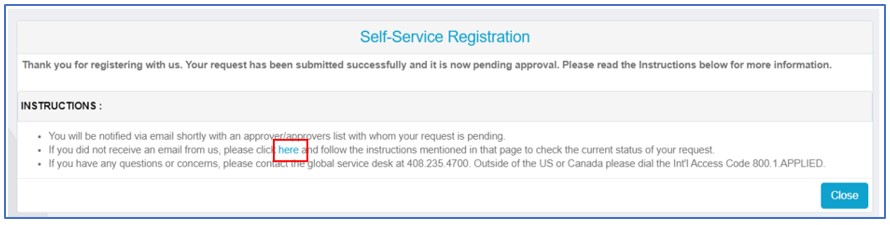
- After successful submission of the request, you will see the below screen. Click the link (highlighted below) to
- Check the status of your request.
- Who is it pending with for approval?
- The registration request process is complete. And you will receive an email notification.
This chapter will brief you the steps required to track the status of your supplier account.
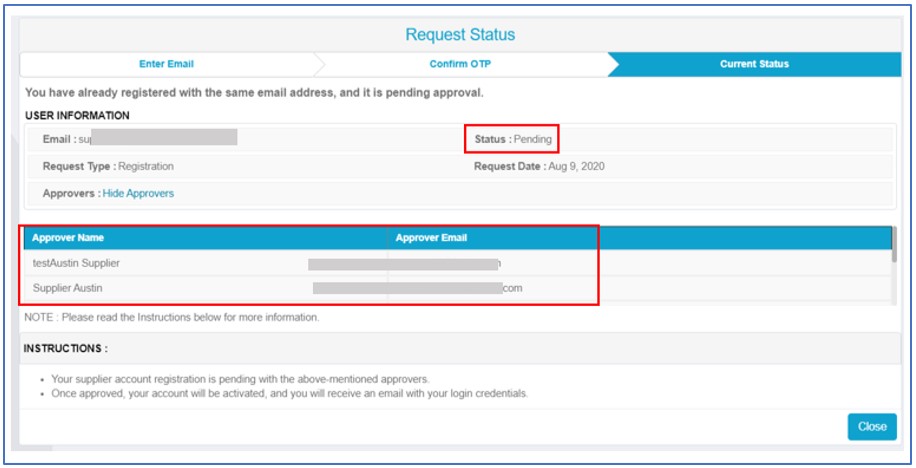
- What is my supplier account‘s current status?
- If status is pending, who is the approver/approvers for the request?
- Who to contact regarding a pending request?
-
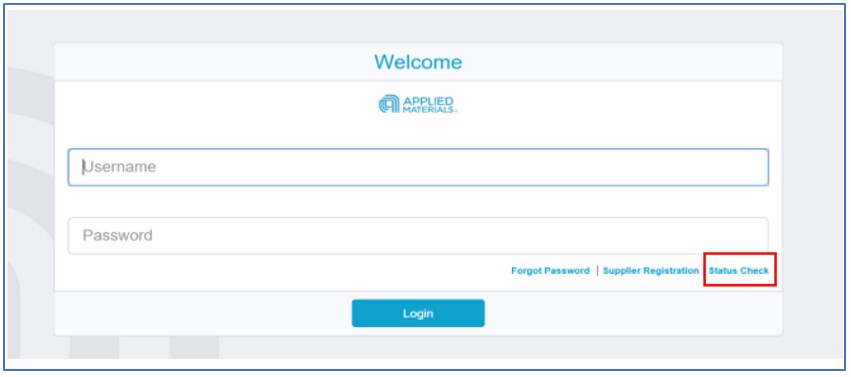
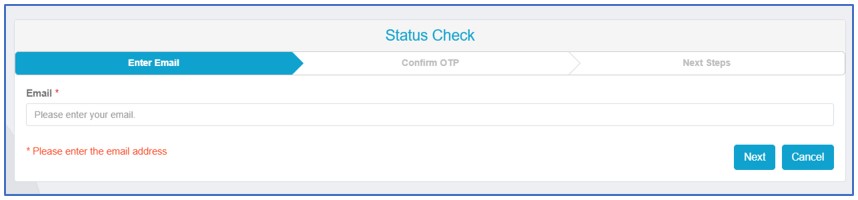
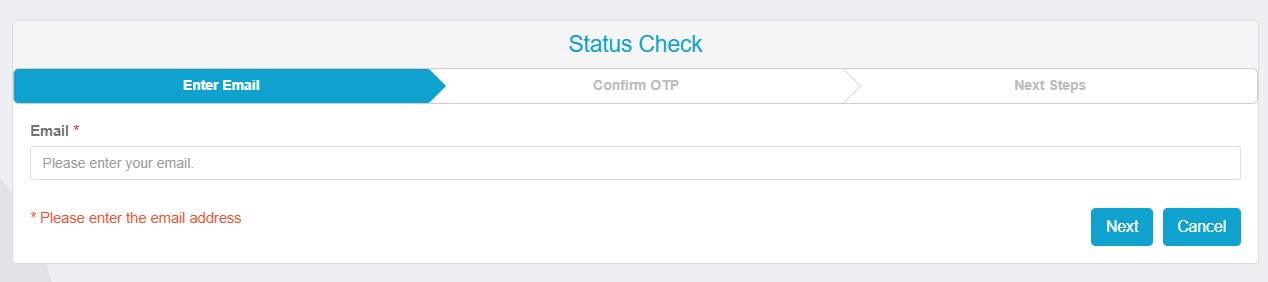
You can check your request status either by clicking the highlighted link from the registration success page (previous step) or by clicking the Status Check link from the Login page.
- Enter the email address you have registered with to check its status.
- You will receive an (One Time Password) OTP to the email address you used in the previous step.
- Enter the OTP pin in the below prompt to proceed.
- Once you validate the OTP, you will see the status of your request and the approver details.
-
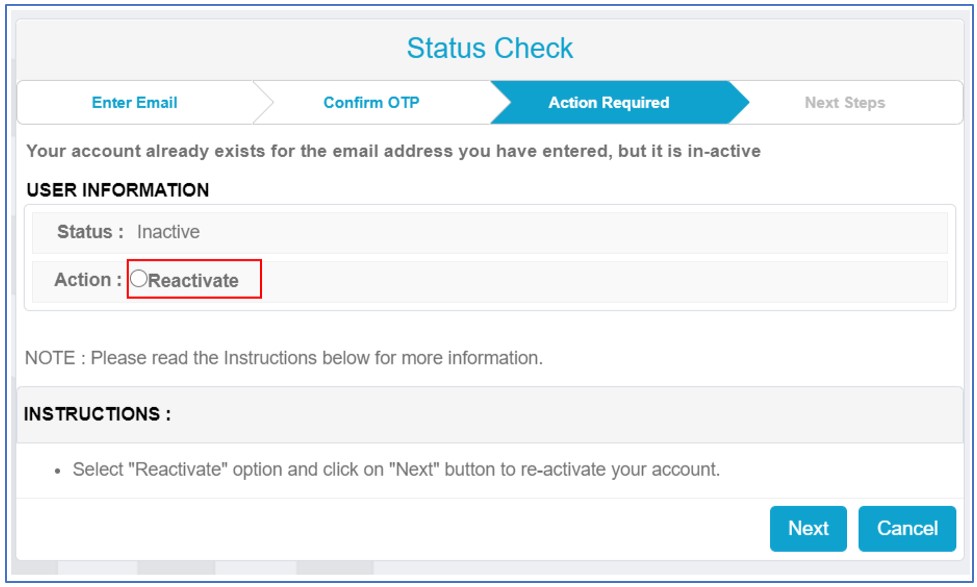
If you haven‘t logged in to the Identity portal for 90 days, your account will be automatically de-activated. You can re-activate your account from ’Status Check’ page. From Status Check page, enter your email and the One Time Password. Select ‘Reactivate’ option to reactivate your account.
- Once you successfully submitted request for re-activation, it will be sent for approval to the Partner Delegate. Once your request is approved, your account will be re-activated.
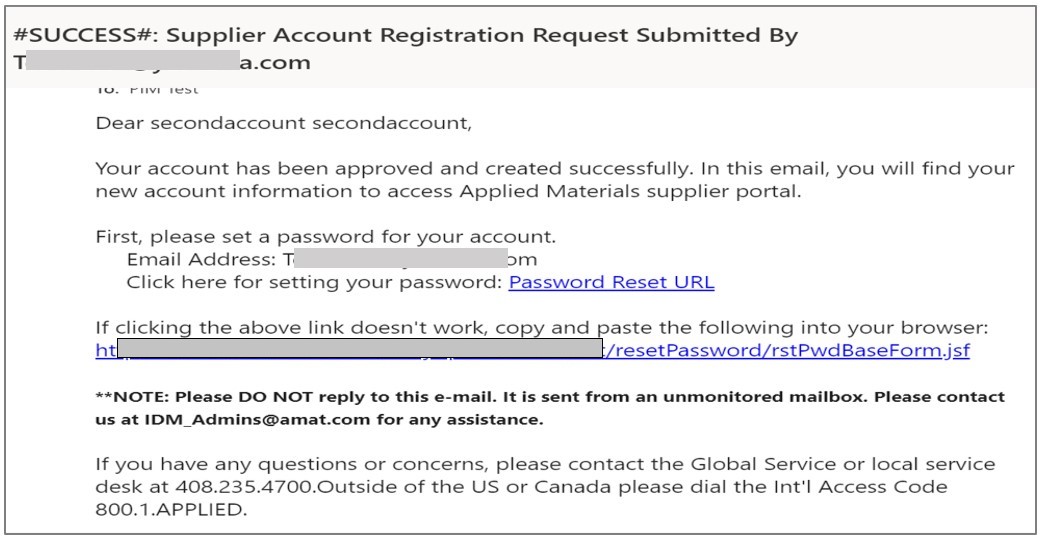
- Once your account is approved, you will receive an email notification to set your password for your account for the first time.
- Click the link in the email to set the password
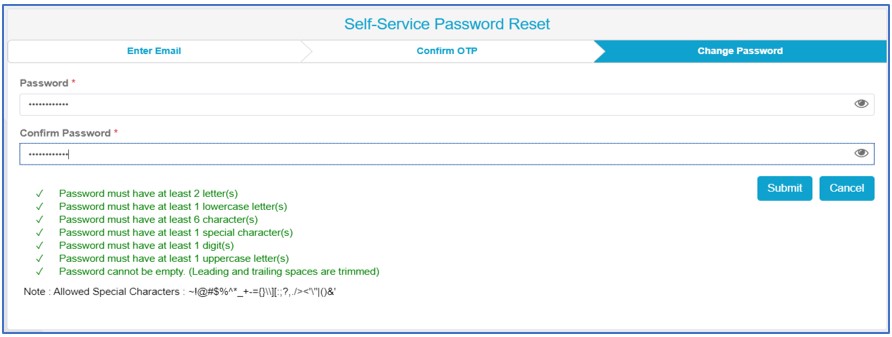
- Enter the email address you registered your account with to set its password.
- You will receive an OTP to the email address you used in the previous step. Enter the OTP pin in the prompt to proceed.

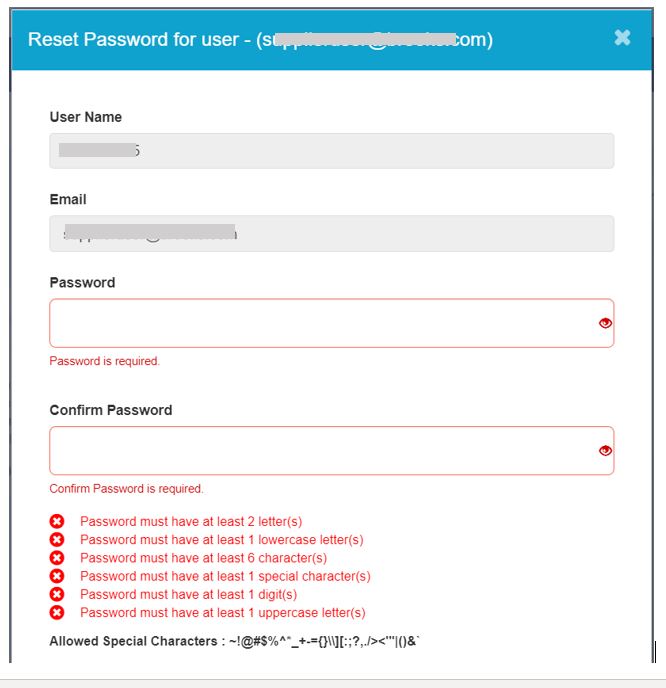
- Set the password for the account.
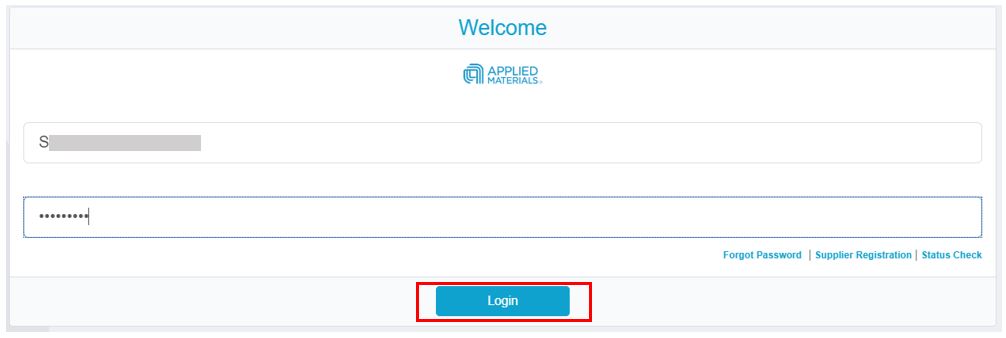
- Now you have successfully set your account‘s password. Please click ‘Login’ button to login to the

- After setting your password, use the email address that you used to register your account and the newly set password and click ‘Login’ to login to the portal.
This chapter describes the process of request/revoke application access, Track the request, manage your profile, update your primary site.
a) How to request/revoke application access?
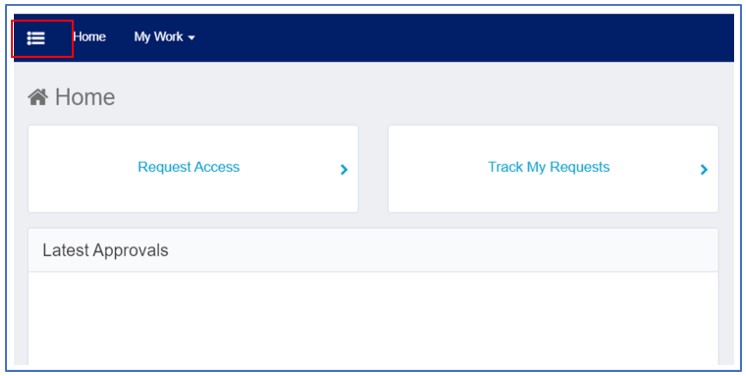
- Once you log in to the portal, you will see the ‘Home’ screen. Click the hamburger icon (highlighted below) from the top left corner of the ‘Home’ screen
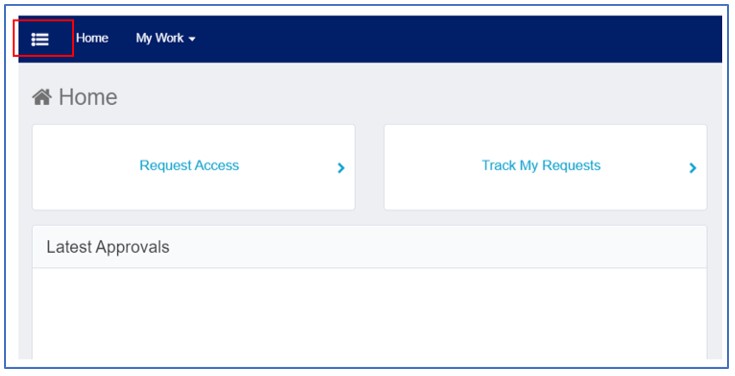
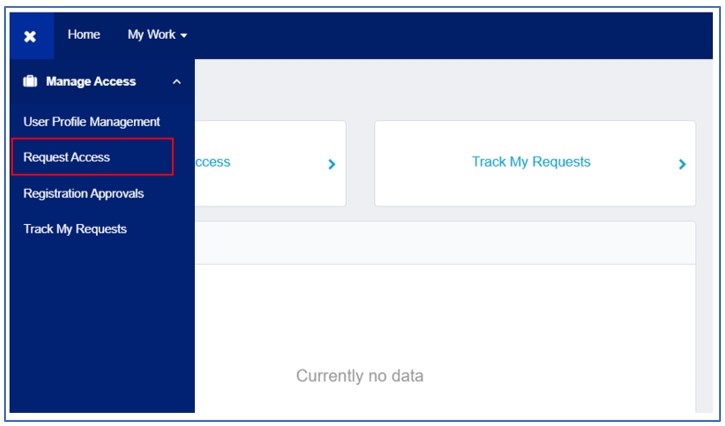
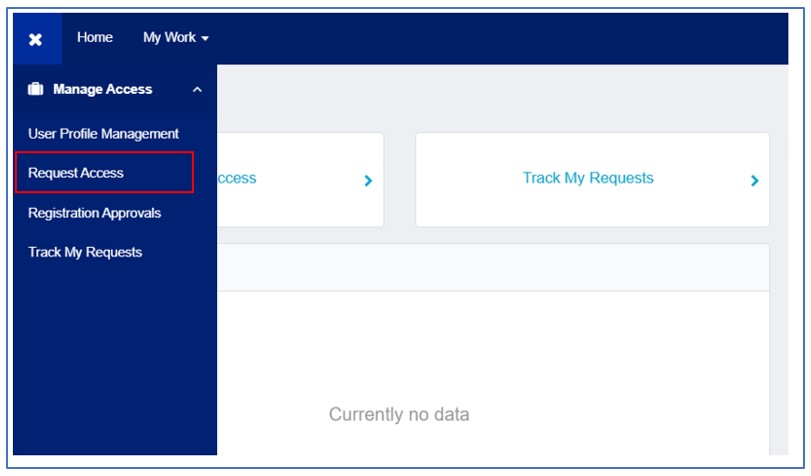
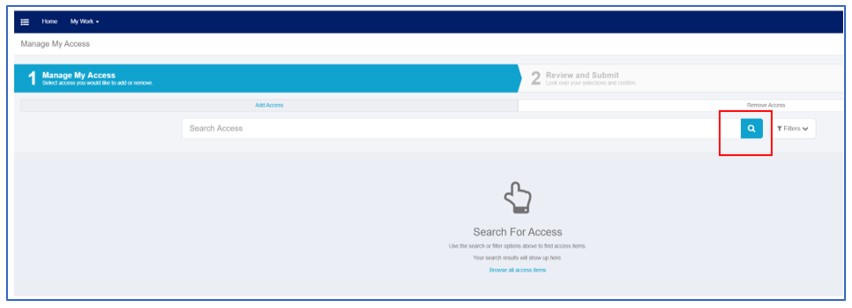
- Select ‘Request Access’
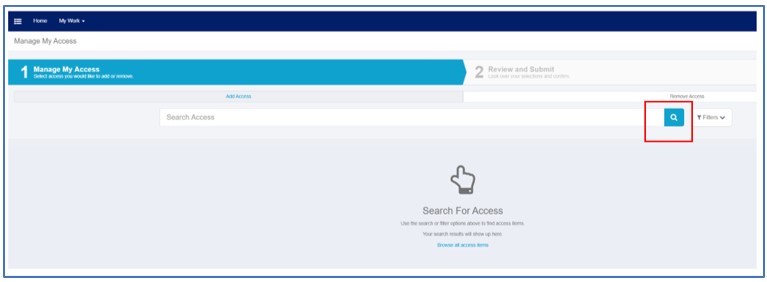
- Click ‘Search’ button to search all application available for request.
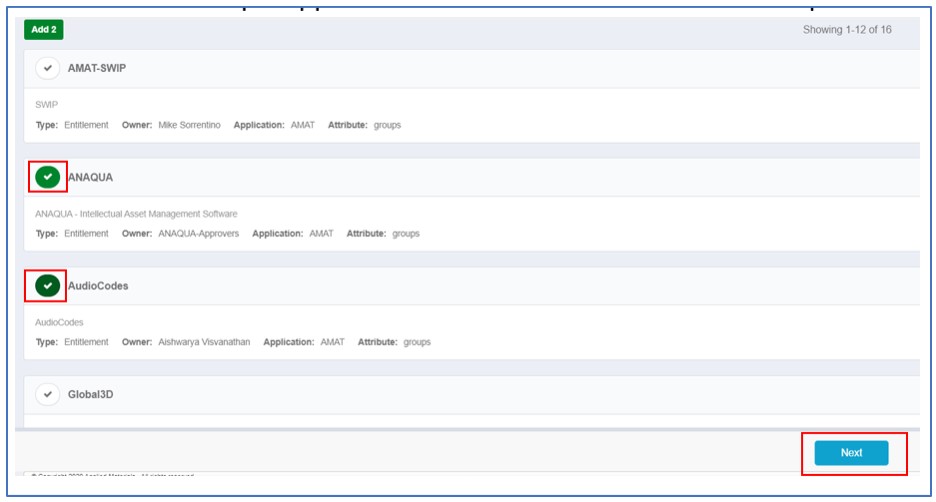
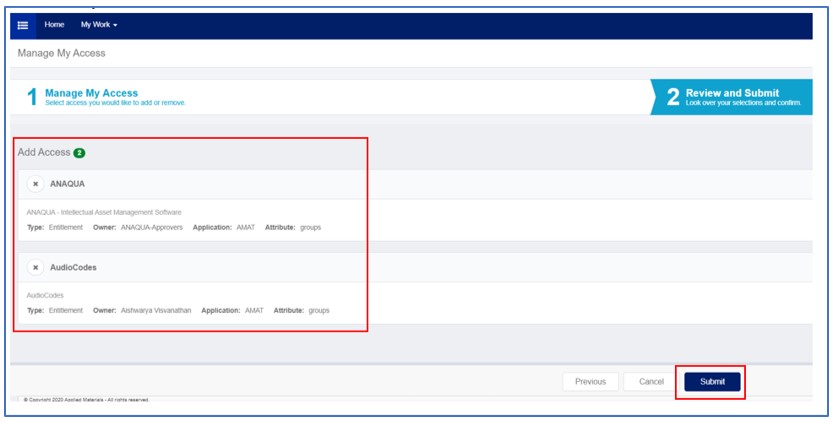
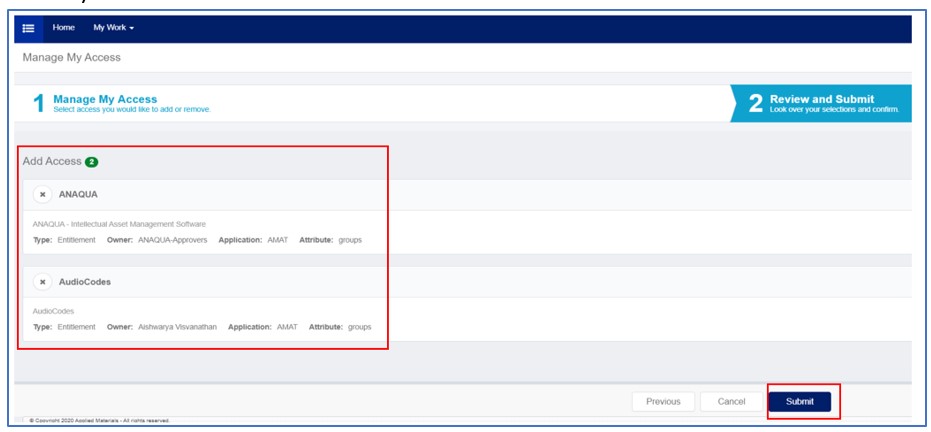
- Select one or multiple applications from the list and click ‘Next’ to proceed further.
- Review your selection and then click ‘Submit‘
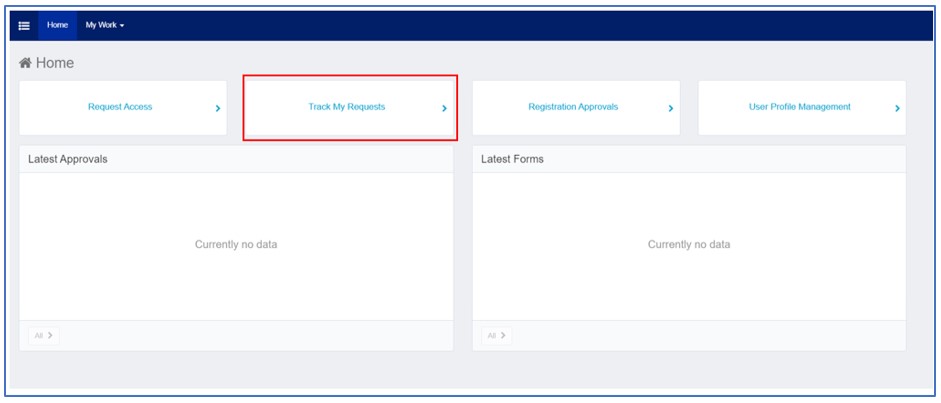
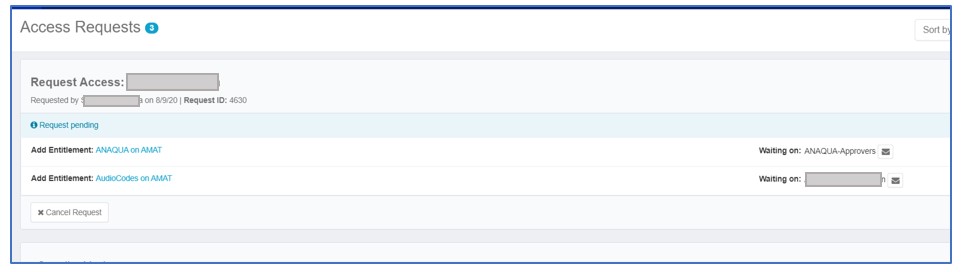
- From your ‘Home’ screen, click on the ‘Track My Request’ tile to track your application requests.
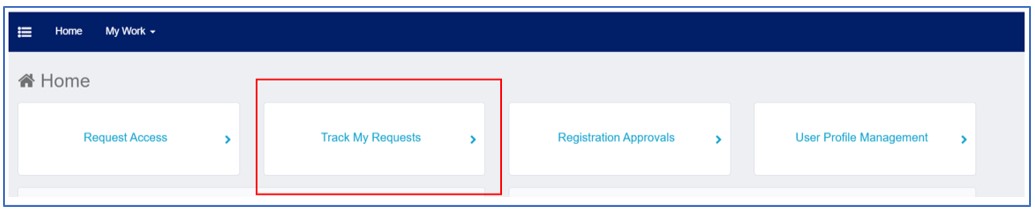
- You will see your application request status.
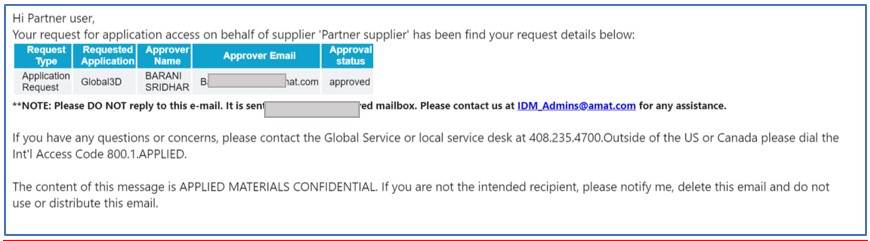
 Note: An email notification will be sent to the approvers regarding your request.
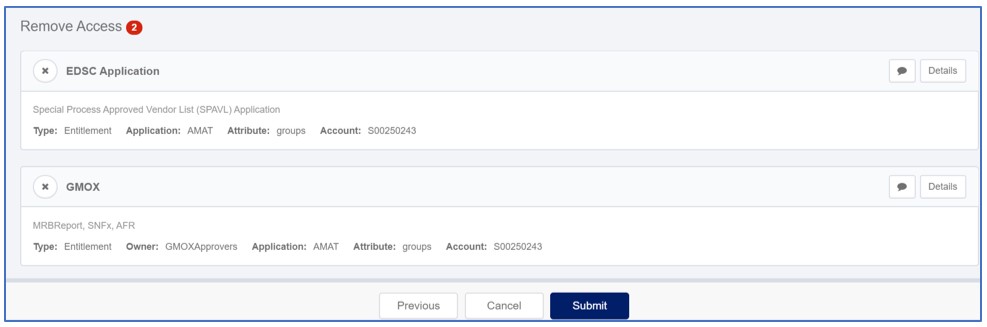
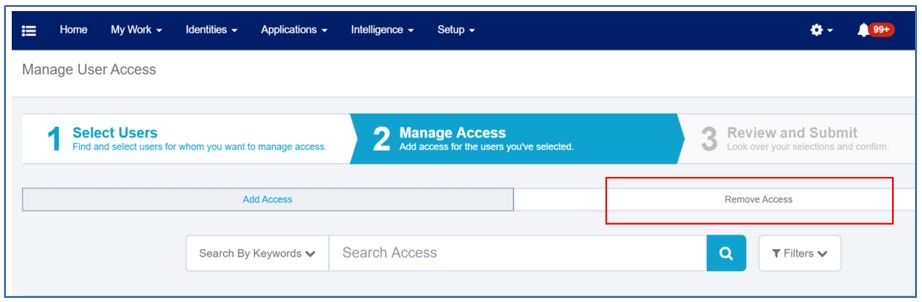
- From the access request screen, click on the ‘Remove Access’ tab
- You will see the list of current application access that you hold. Click on the applications that you want to revoke access for and click ‘Next’.

- Review Selection and Submit. You can track the status of the request from ‘Track my request’ tile in the Home page.
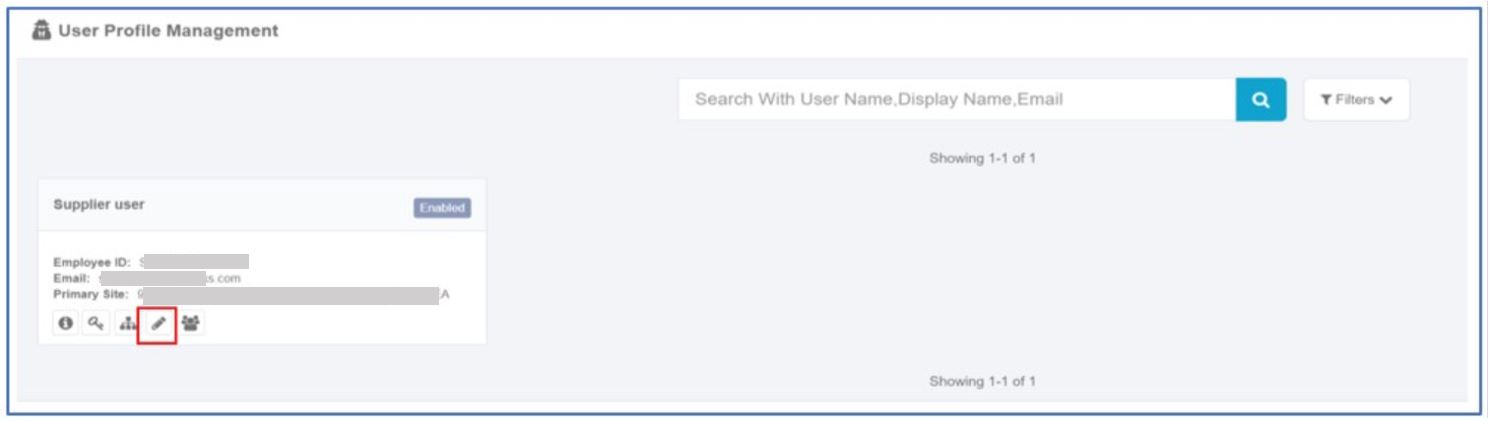
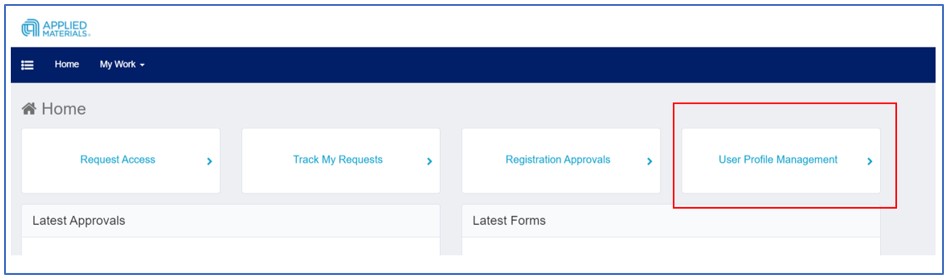
- From Home Screen, Click on the tile ’User Profile Management’

- Click on the below icon to edit your profile.
-
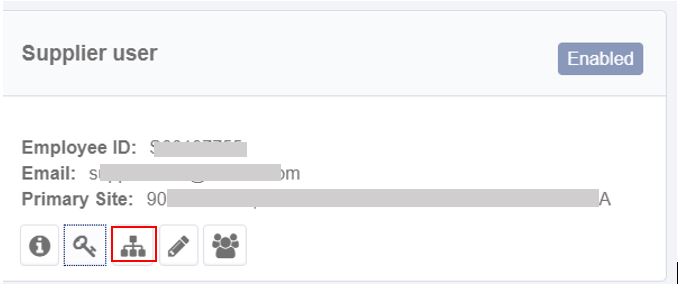
Click on below icon to change you Primary Site.

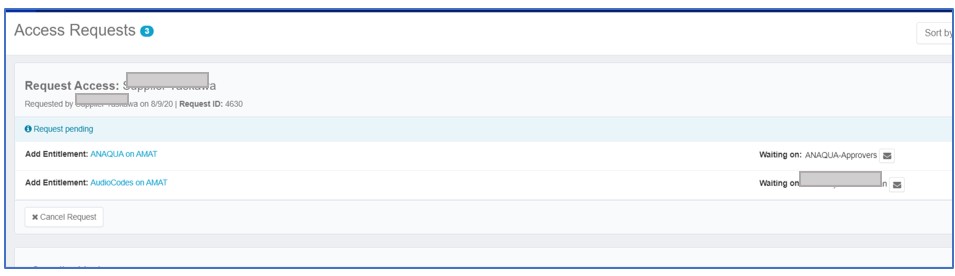
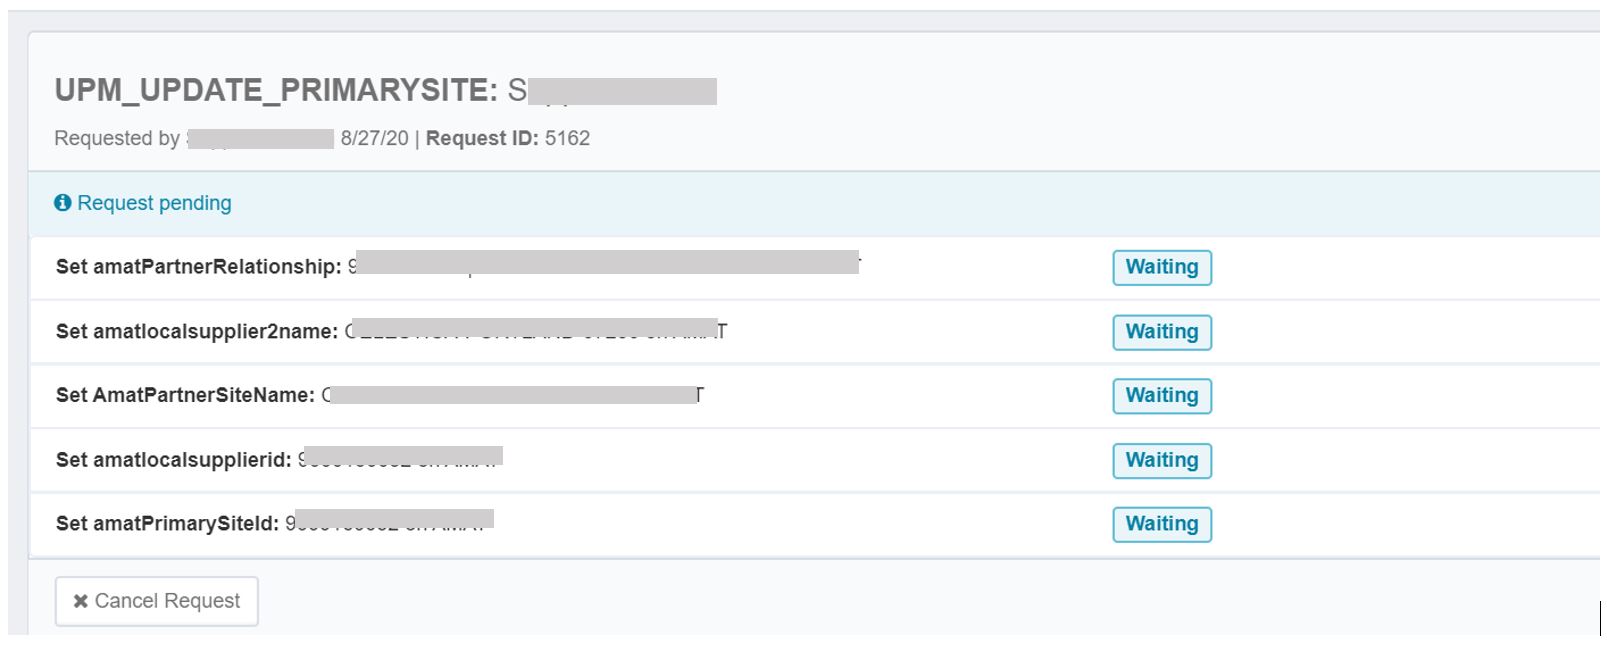
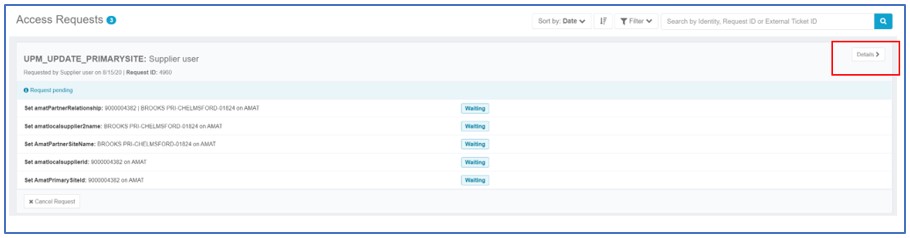
- Track your request here: Click on ‘Track My Requests‘
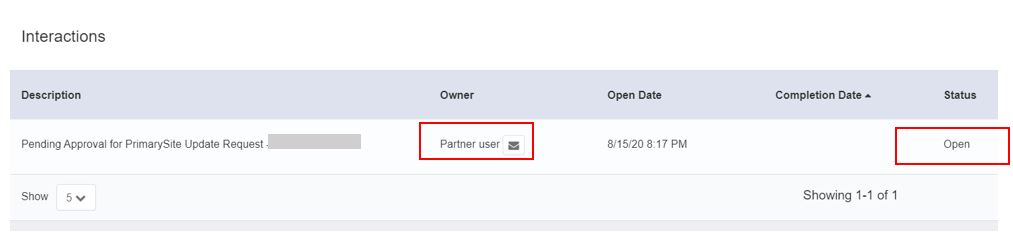
- To view the approvers details and request status- Click on the details as highlighted below
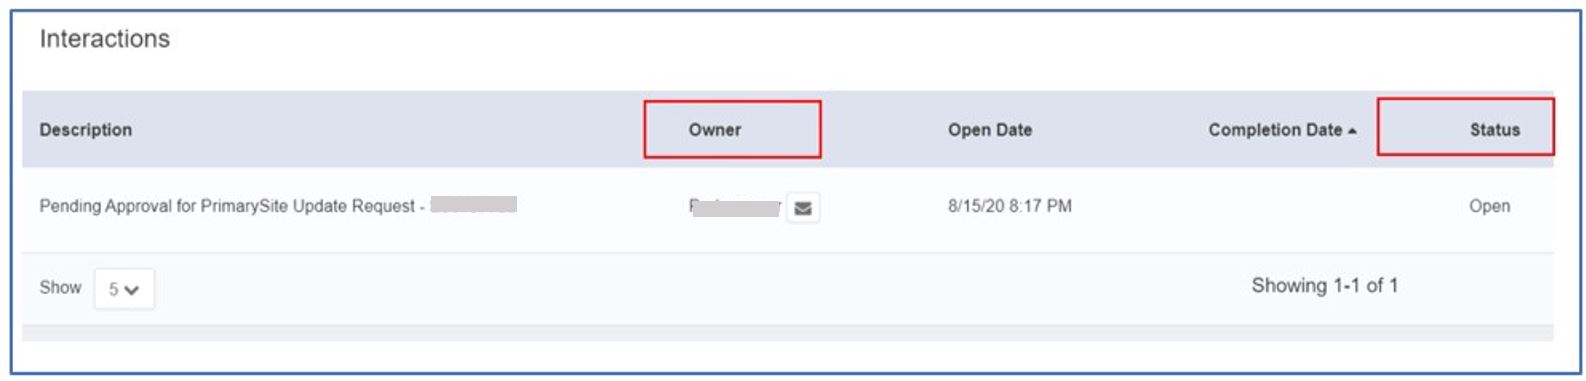
- Under ‘Interactions’ section you can see name of the approver and the request status
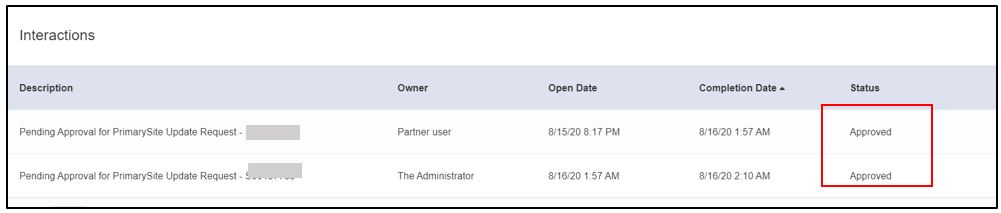
- Once it is approved, you will see the status as below
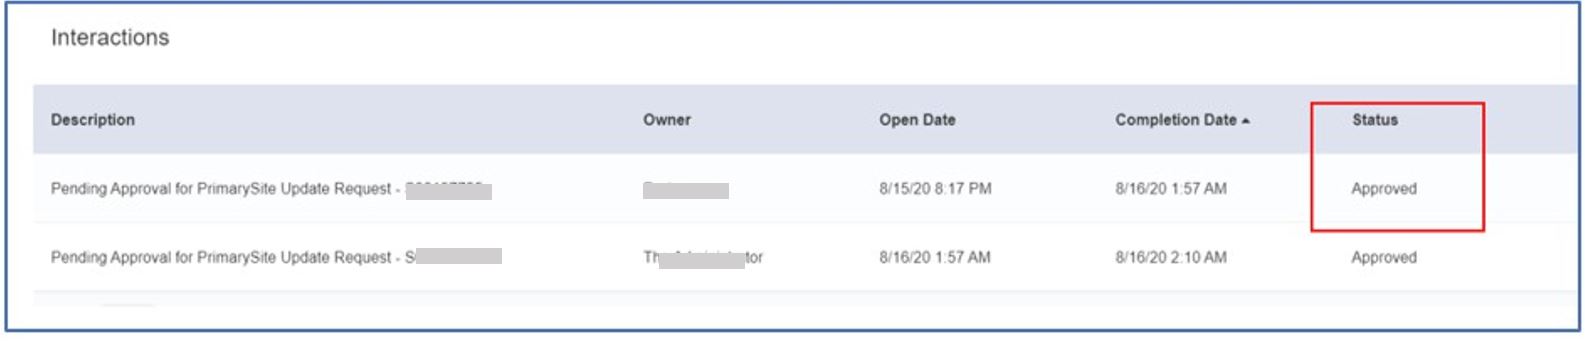
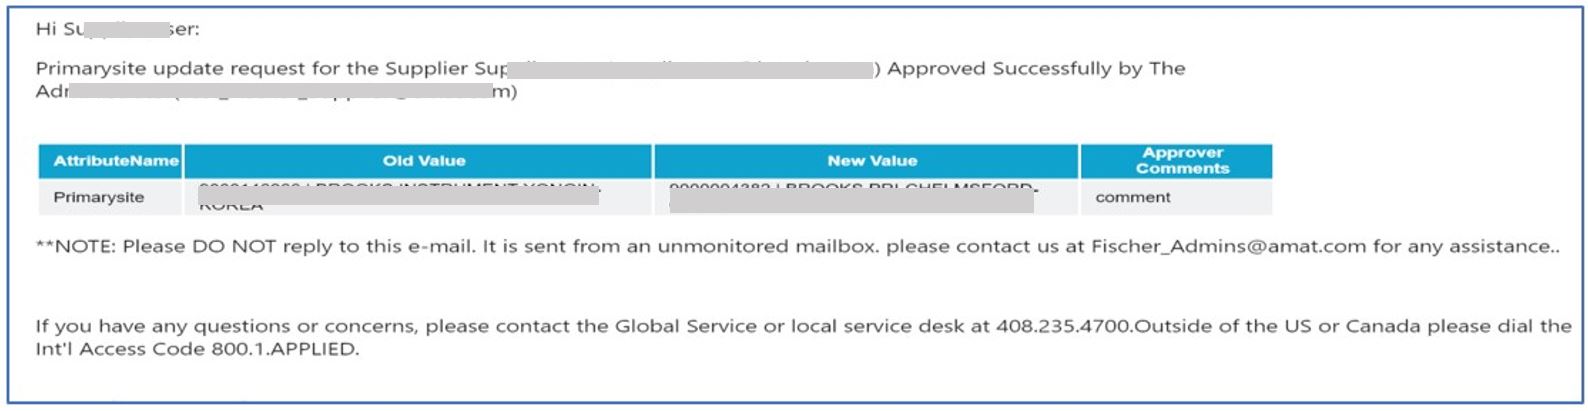
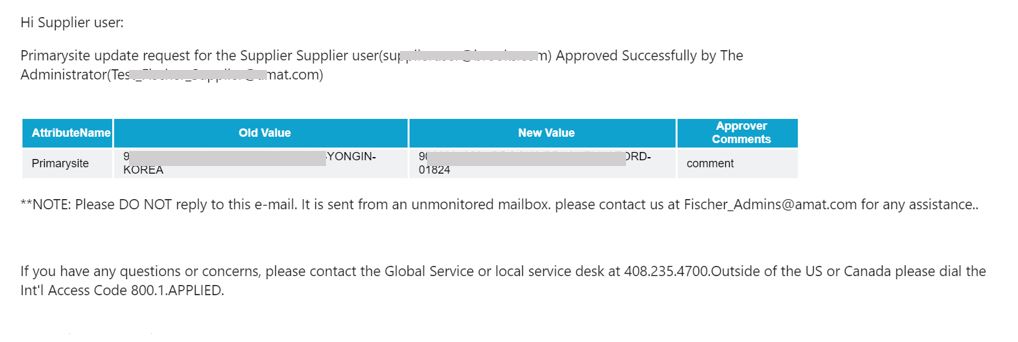
- You will also receive an email notification, once your request is approved
This chapter describes the process of request/revoke application access, Track the request, manage profile, update primary site.
a) How to request/revoke application access
- Once you log in to the identity portal, you will see the ‘Home’ screen. Click the hamburger icon (highlighted below) from the top left corner of the ‘Home’ screen.
- Select ‘Request Access’
- Partner delegate can request application access for him/her or other partner users. Select the user.
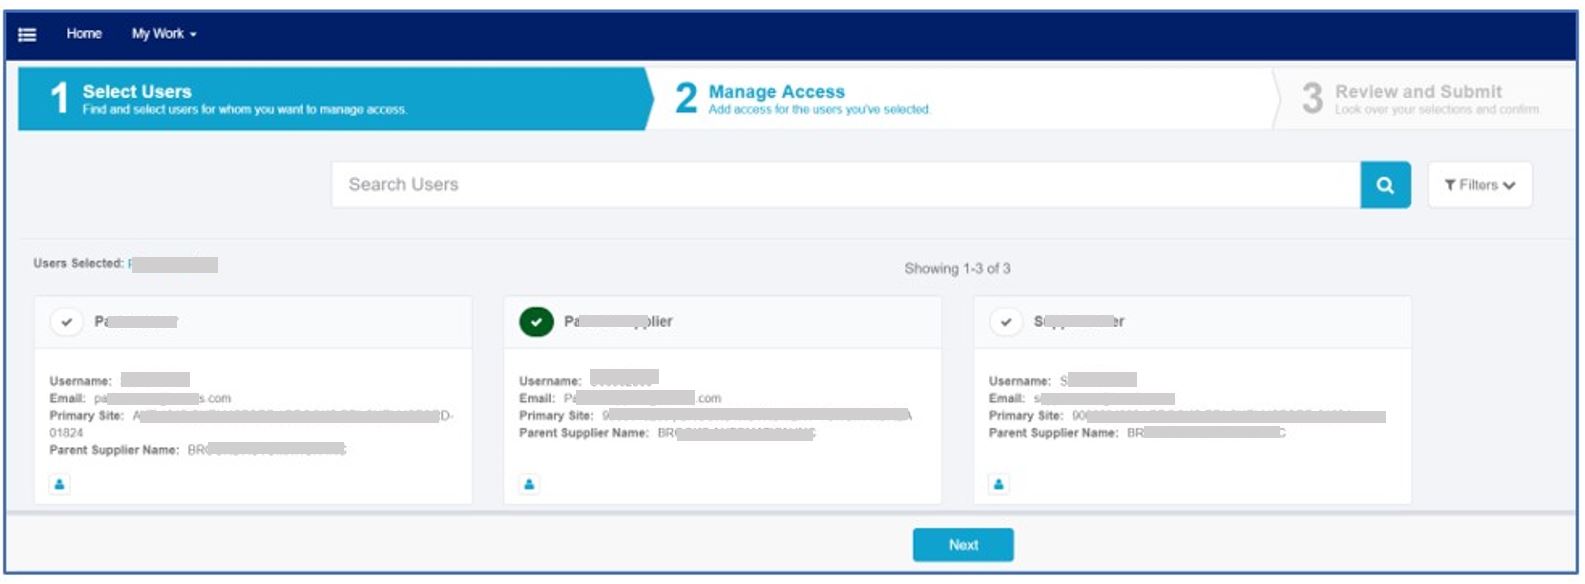
- Click ‘Search’ button to search all application available for request.
- Select one or multiple applications from the list and click ‘Next’ to proceed further.

- Review your selection and then click ‘Submit’
- From your ‘Home’ screen, click on the ‘Track My Request’ tile to track your application requests.
- You will see your application request status.
- You will receive an email notification once your application request is approved by the application owner
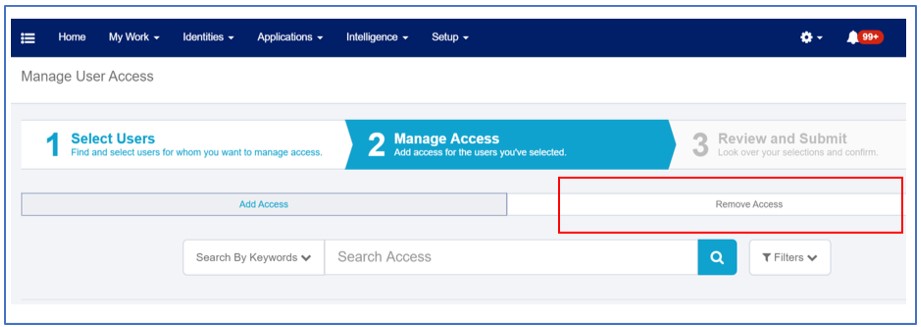
- From the access request screen, click on the ‘Remove Access’ tab
- You will see the list of current application access that you hold. Click on the applications that you want to revoke access for and click ‘Next’.
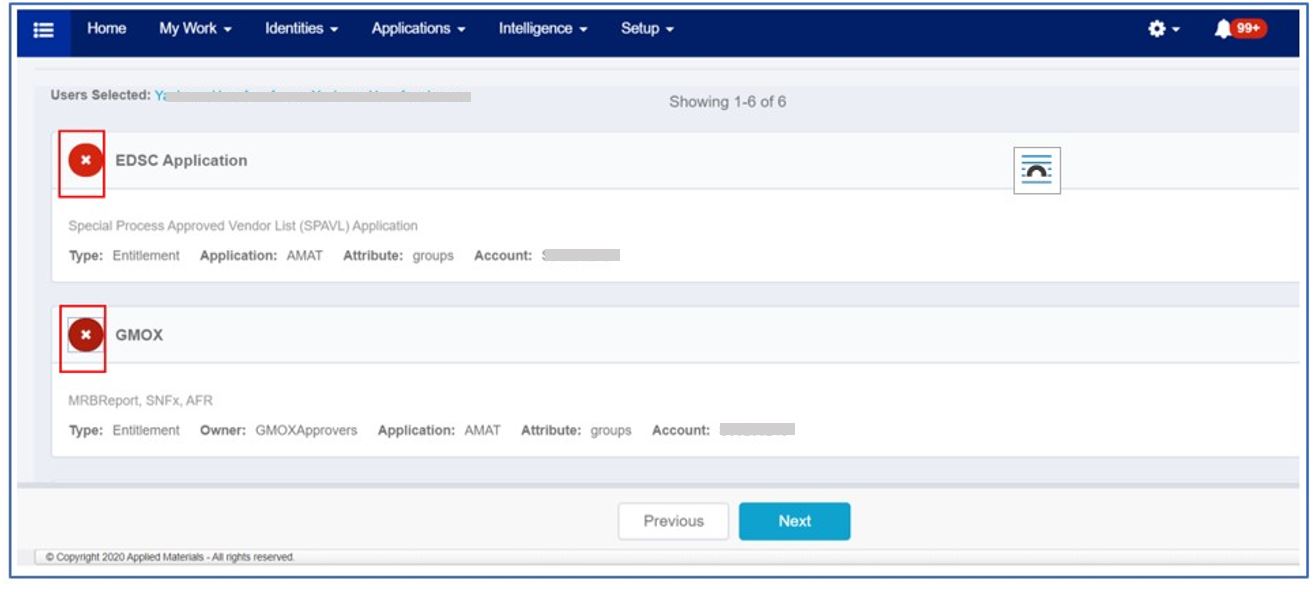
- Review Selection and Submit. You can track the status of the request from ‘Track my request’ tile in the Home page.

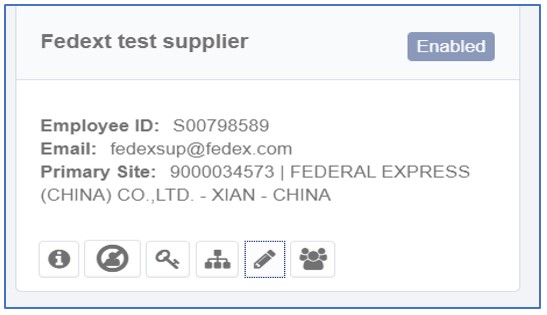
- From Home screen, click on the tile ‘User Profile Management‘
- Partner Delegate can manage their profile and partner users.
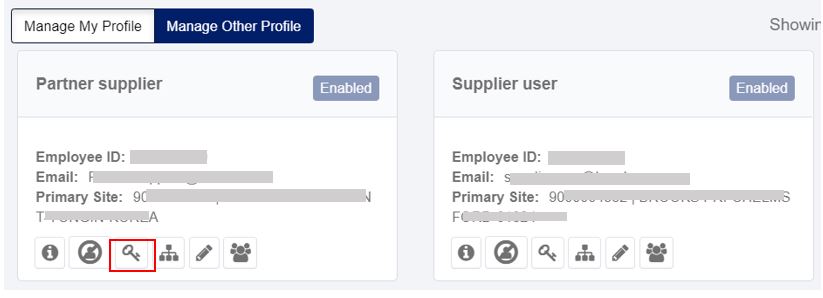
- Partner Delegate can reset their password and on-behalf of Partner Users.
- Partner Delegate can manage their profile and on-behalf of a Partner User.
- Click on the below icon to change your Primary Site.
- Track your request here: Click on ‘Track My Requests‘
- To view the approvers details and request status- Click on the details as highlighted below.
- Under ‘Interactions’ section you will see who the approver and the status of the request is.
- Once it is approved, you will see the status as below:
- You will also receive an email notification, once your request is approved.
- Partner delegate will receive an email notification request for Registration Approval. Click on the link in the email to approve the request.
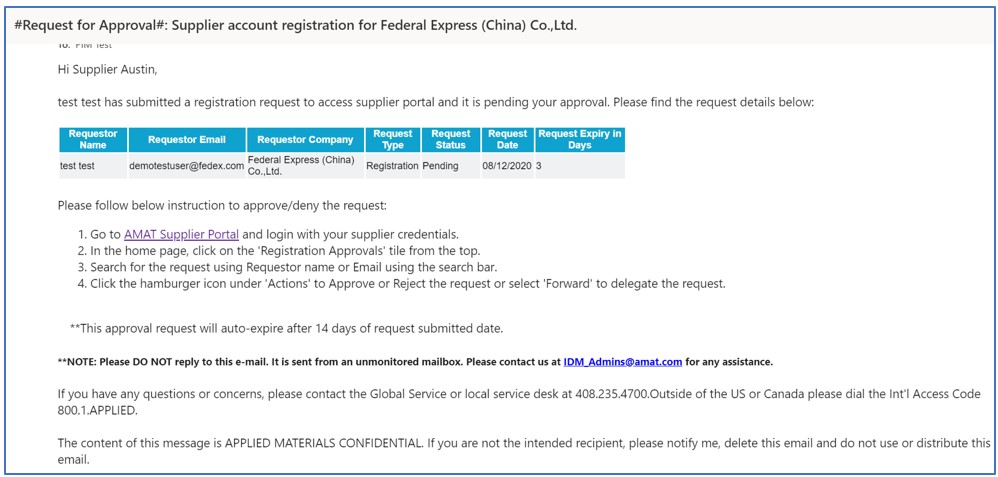
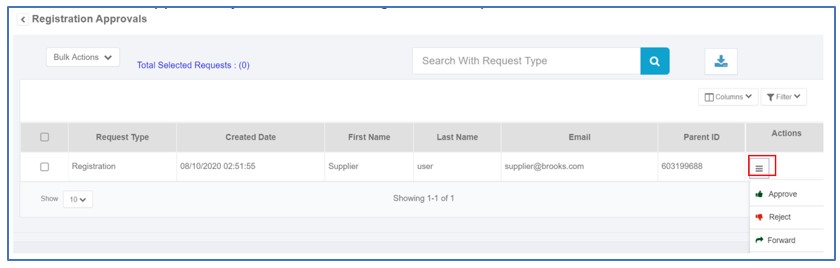
- From the ‘Home Screen‘, click on the ‘Registration Approvals’ tile.

- Click on ‘Actions’ to approve/reject/forward the registration request
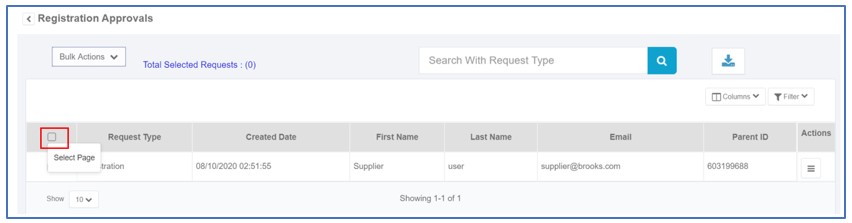
- To Bulk Approve requests, click on the ‘Select Page’ option.
- Click on ‘Bulk Actions’ to approve all selected requests.
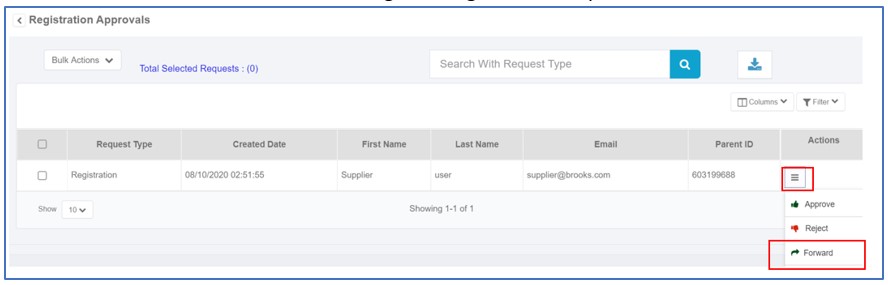
- Click on ‘Actions’ and select Forward to delegate a registration request.
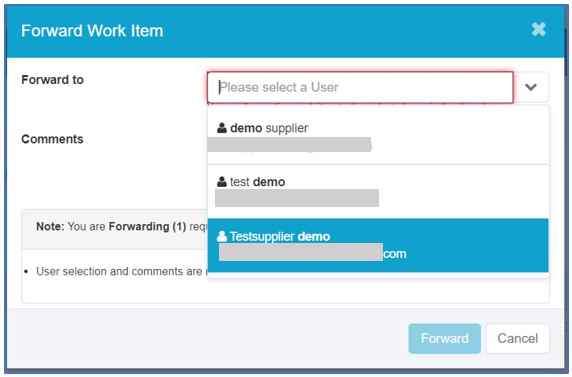
- From the pop-up, search for the person you want to delegate the request to and click ‘Forward’.
- Partner Delegate can deactivate a Partner User.
- To Re-activate a Partner User, click on the highlighted icon in the bottom. The ‘Disabled’ shows the partner user‘s current status is ‘Inactive’.

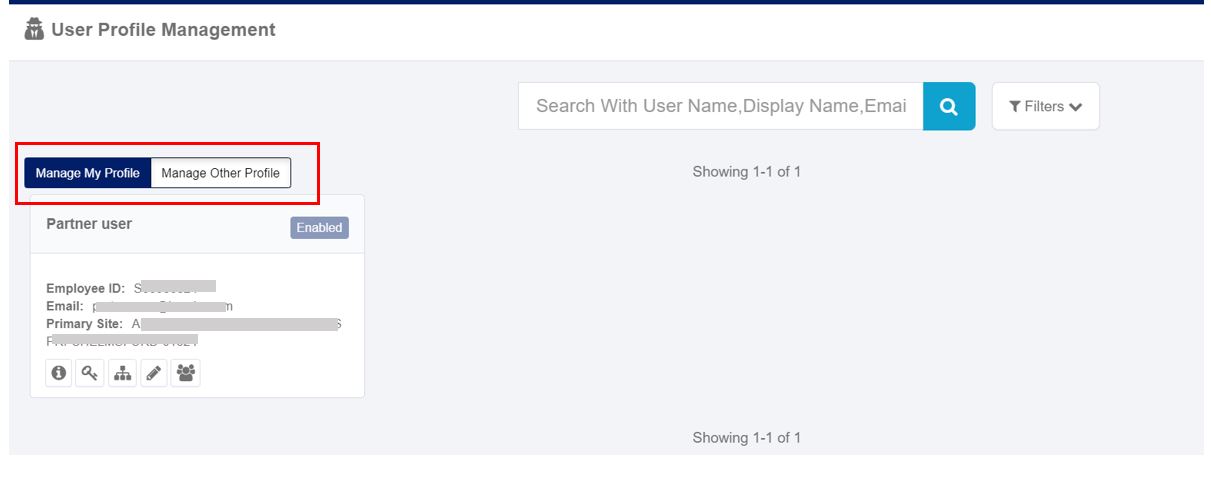
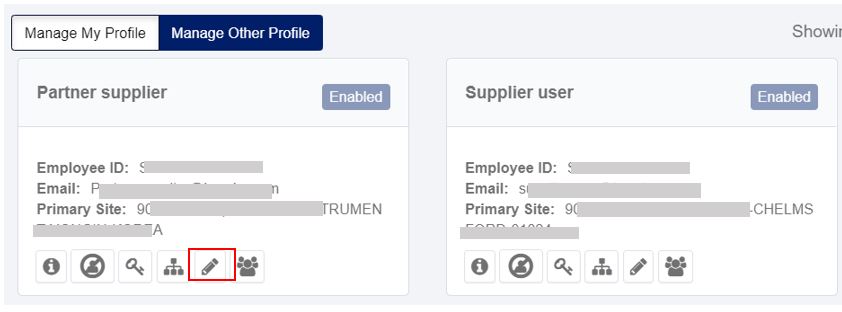
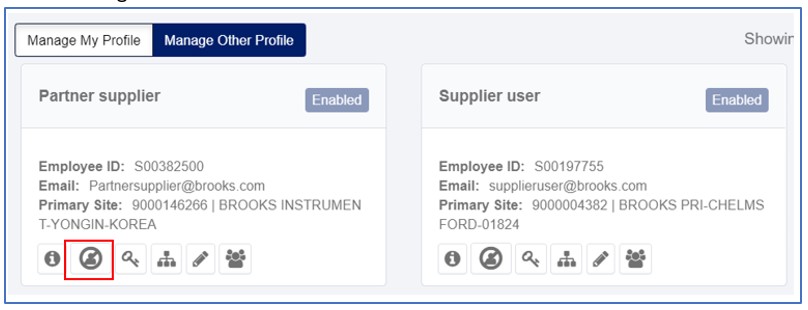
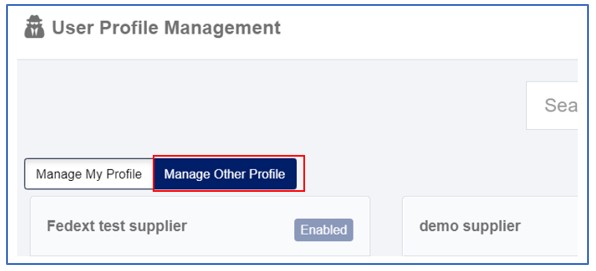
- From User profile management, click on the ‘Manage other Profiles’ toggle.
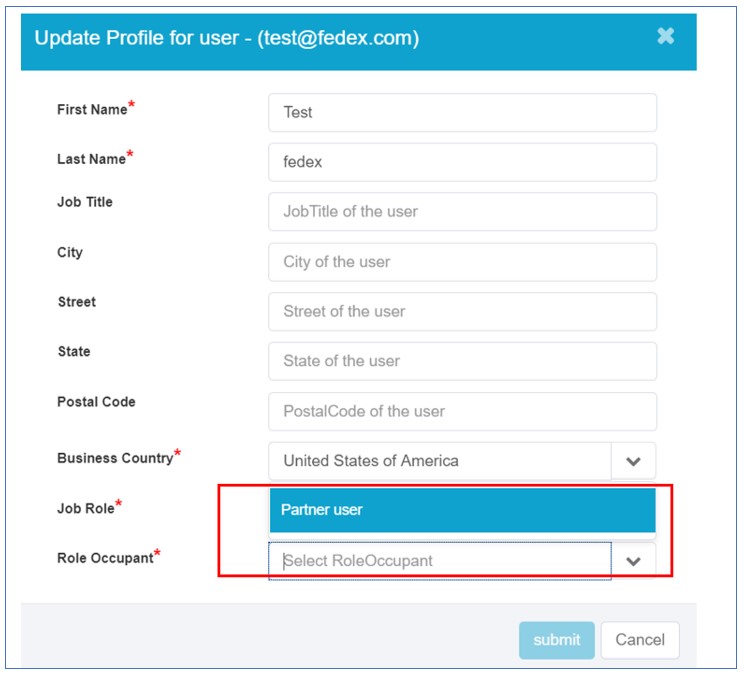
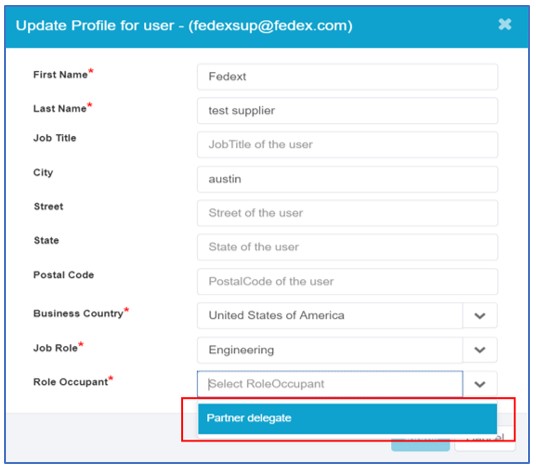
- Choose the partner user who you want to elevate as a Partner Delegate. Click on Update Profile icon
- Update their Role occupant as ‘Partner Delegate’.
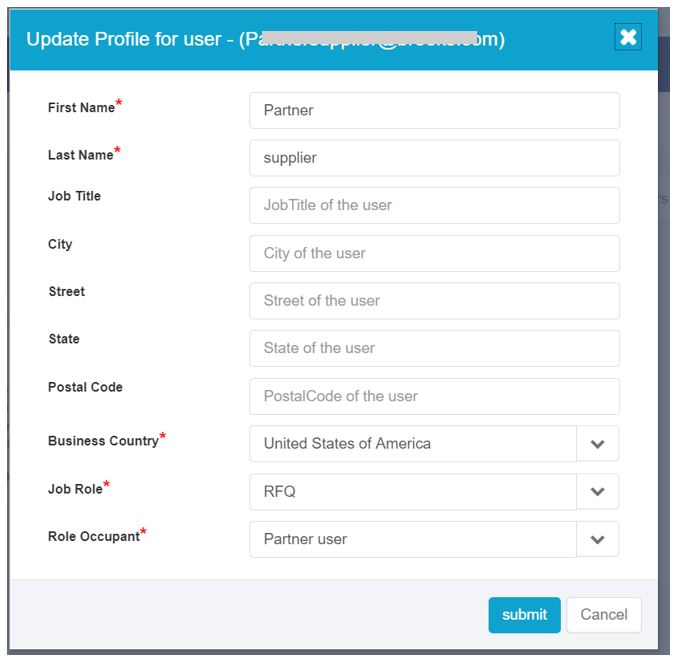
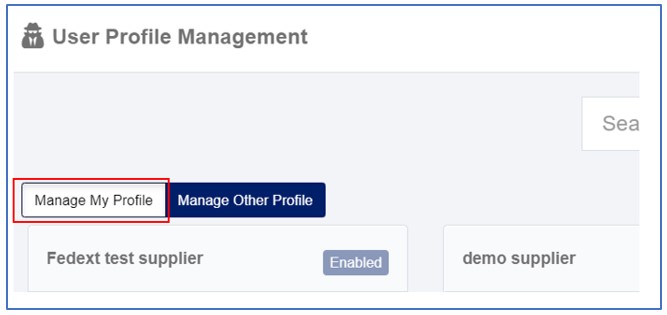
- To de-elevate your role to Partner User, Click on Manage My Profile.
- Click on Update Profile
- Change your Role Occupant to partner user and click ‘Submit’.